How To Create Your Own Ear Training Patch (Ableton)

No matter what genre of music you’re working with (or even if you’re working with sounds and effects), your ears are your most powerful tool and selling point.

Hearing the nuances in sound – what happens when different frequencies are cut or boosted, for example – means you can quickly spot when something sounds too muddy, edgy, boxy, etc.

To help you hear these differences, I’ve created a guide to making your own ear training program. The following patch is largely modelled off David Moulton’s Golden Ears training program (created with his permission).

It works by randomly boosting or cutting your chosen audio signal at random frequency ranges, which you can guess and check your answers with later. Sound good? Then click the link, or follow along below!

Compatibility With Other DAWs

The first thing I should mention, is if you are working with a DAW other than Ableton, there are three things you need to emulate the patch:
 
  1. An effects rack that can be linked to a chain selector (I’ll explain what that is below).
  2. A parametric EQ
  3. An envelope shaper (this will automate the EQ)

You will also need to map the chain selector to a randomization tool, like an LFO.

How It Works
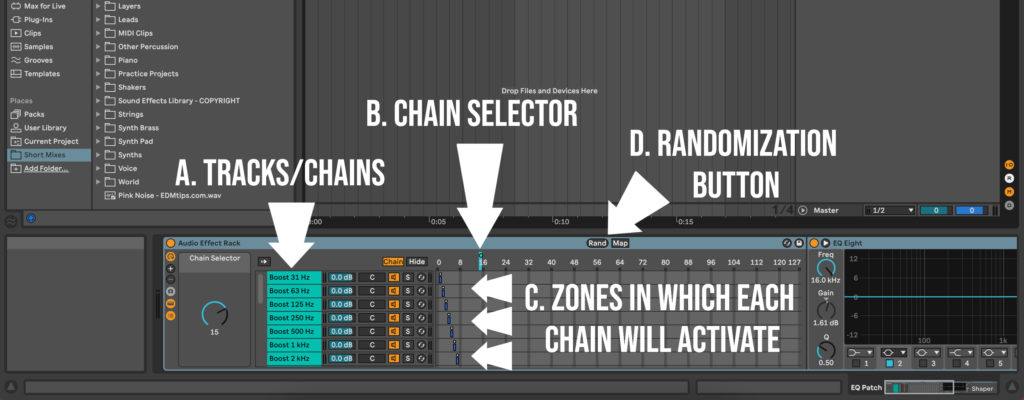
Fig 1.
Here’s the basic idea: We will be creating 20 separate tracks, or “chains” (A), grouped to a bus called an effects rack.
 
Each chain is set to boost or cut the frequency, using the EQ and the envelope shaper (which automates the boost/cut so you don’t have to).
 
Each chain will only activate if its particular zone is selected by the chain selector (B and C).
 
Finally, the randomization button (D) is configured to only select a single zone, (read: chain), which means only a single frequency range will be boosted or attenuated.
 
Later, we’ll see that the EQ (bottom R of fig 1) boosts each chain at a specific frequency, and is automated by our shaper (offscreen to the R of the EQ).

1. Building the First Effects Chain

Fig 2.
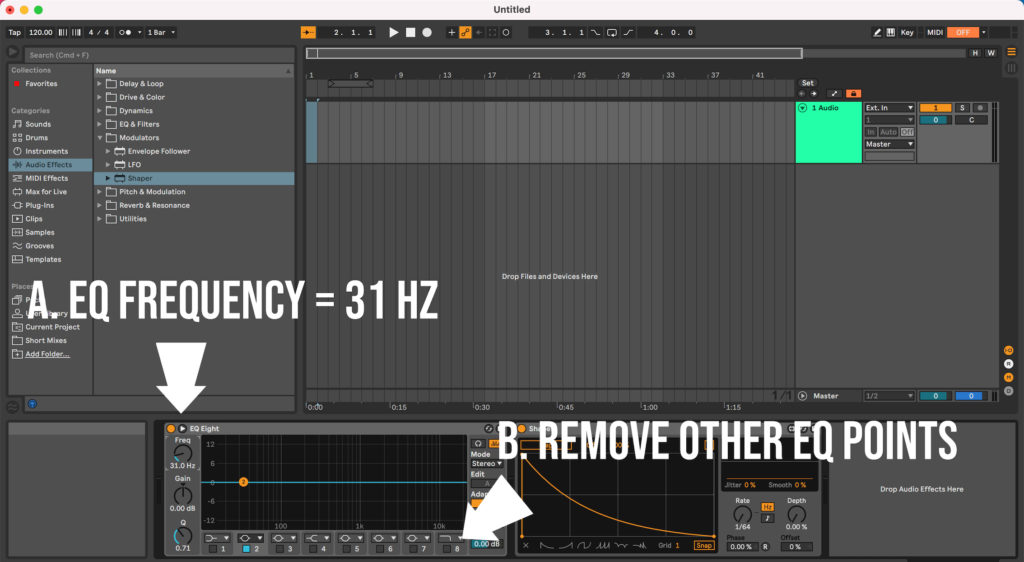
Start off with a single audio track in the arrangement view, and drop an EQ-eight and a shaper into it (search for these in the browser to the L side of the screen).
 
Next, choose a single bell-shaped EQ point, and enter “31 Hz” into the frequency knob (A). To keep it simple, remove the other EQ points (B).
 
Then adjust the Q value to 0.50 – this widens the bandwidth that is cut or boosted, so you can more easily hear the difference.
 
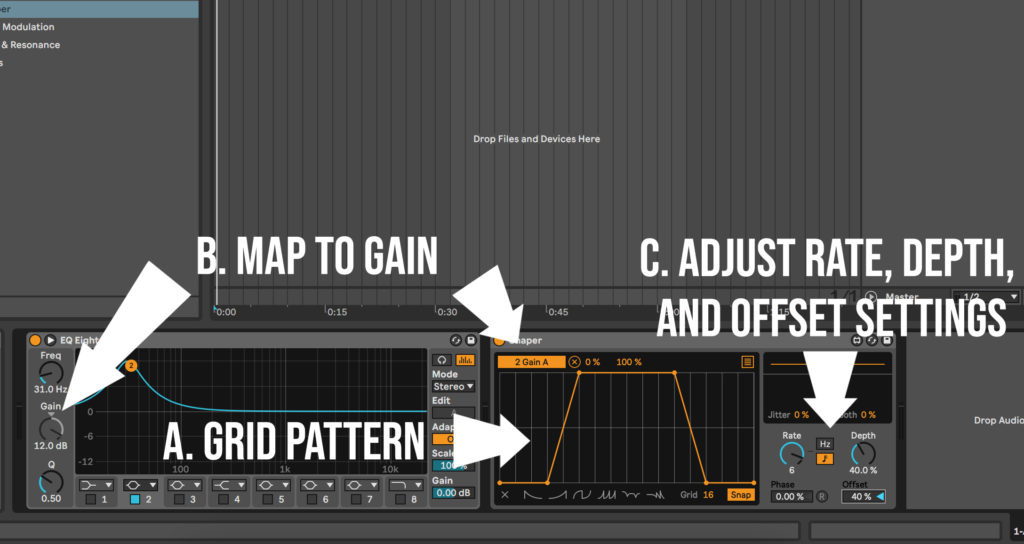
Now it’s time to move on to the shaper: Press the X button in the corner to remove the current grid pattern, increase the number of grid points to 16 (bottom centre), then add 6 points to make the pattern in fig 3 below (A).
Fig 3.
 
This grid controls when and for how long a signal is boosted or attenuated, so you can adjust this to taste.
 
Now we map the shaper to the EQ by clicking the map button, then the gain on our EQ point (B). This will make the EQ move rapidly up and down.
 
Finally, let’s change the rate to six (or 3/4 of a bar), and the depth and offset to 40% (C). That should start us off at 0 dB, followed by a boost up to 12 dB, and after a few seconds it will drop back down to 0 dB.

2. Adding Additional Chains in An Effects Rack
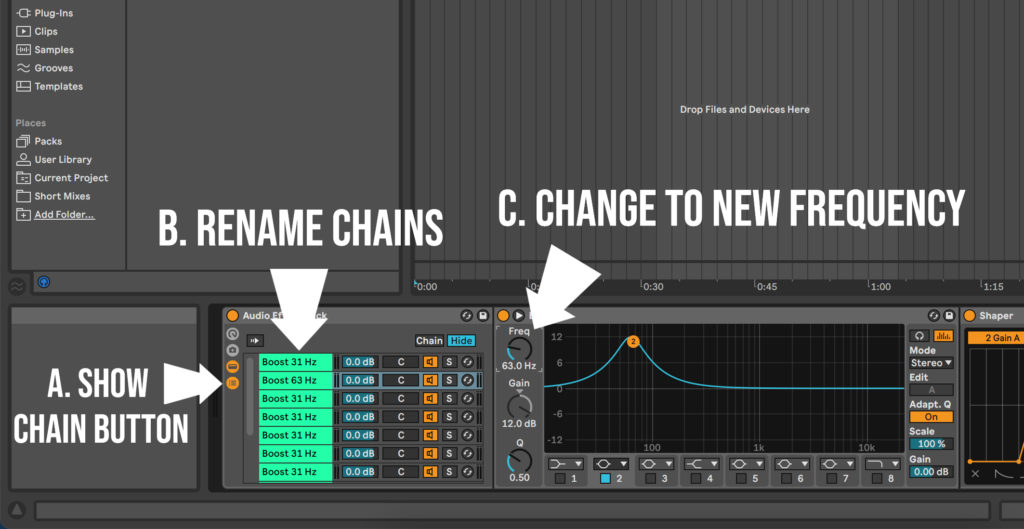
Now we need to group these plugins together. Hold SHIFT and click the top of each plugin to highlight them both. CMD + G (or CTRL + G on a PC) will group them to an effects rack.
 
This will introduce some new controls on the left hand side – click the button that has three lines on it to bring up the chain list (A), and rename the chain there to ‘Boost 31 Hz’ (B).
Fig 4.
We will be working with 10 octaves, or 10 chains to start, so highlight the chain and ht CMD/CRTL + D nine times to duplicate them.
 
Now rename the second chain from the top to 63 Hz – that’s one octave higher than 31 Hz. Change the frequency knob on the EQ for that chain to 63 Hz as well (C). Make sure you have the correct chain highlighted when you do this!
 
Now we need to rename and adjust the EQ frequency for each of the remaining chains (go ahead, I’ll wait). The values for each chain are included below:
 
  1. 31 Hz
  2. 63 Hz
  3. 125 Hz
  4. 250 Hz
  5. 500 Hz
  6. 1 kHz
  7. 2 kHz
  8. 4 kHz
  9. 8 kHz
  10. 16 kHz

3. Set Chain Activation Zones

Now we need to make sure that each of these chains is going to activate separately from the others – because right now if we press play, they will all switch on at once!

Your music may clip or distort when boosted, so it's a good idea to turn the channel fader down to -12 dB to be safe.
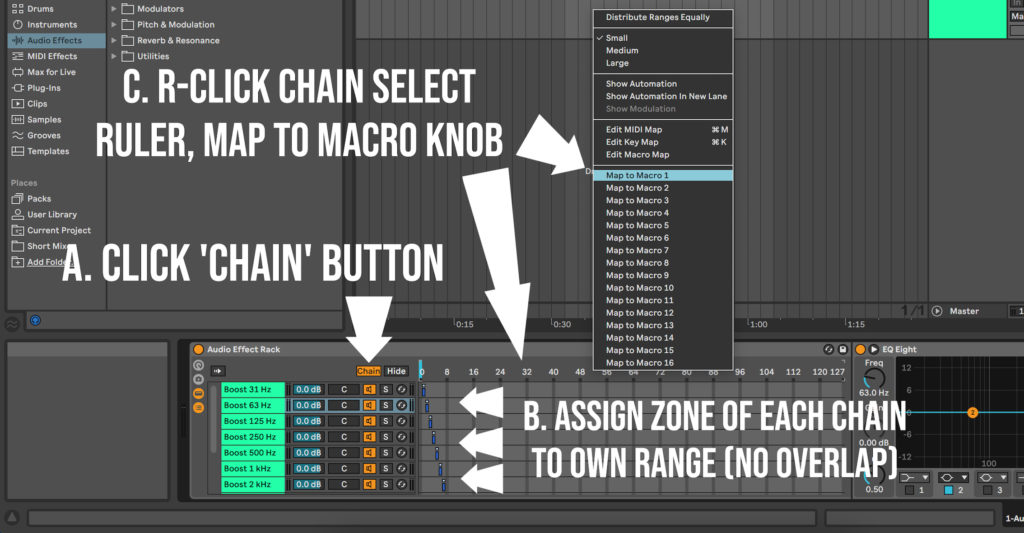
 
At the top of the effects rack, there are two buttons: ‘Hide’ and ‘Chain’. Click the chain button to bring up the zone editor (A), with the chain select ruler at the top (where the numbers from 0-127 are).
Fig 5.
The way this works is the highlit part of the chain selector (the blue bar over the number ‘0’) will activate any chain that has a range within that value (which could be none, all of them, or anything in between).
 
We need to set the zone of each chain to discrete values with no overlap: Set the first chain at ‘1-1’, the second chain at ‘2-2’, third at ‘3-3′, and so on, all the way to ’10-10’ (B).

You can also drag the ends of each zone to include a larger range (for example, '1-5', '6-10', '11-15', etc.), which can make it easier to check your answers later.

Now right click the chain select ruler (the top part of the zone editor) and choose ‘Map to Macro One’ (C). This opens a new box to the left of the chain list, with the first knob there renamed to ‘chain selector’.

4. Adding Randomization

Fig 6.
 
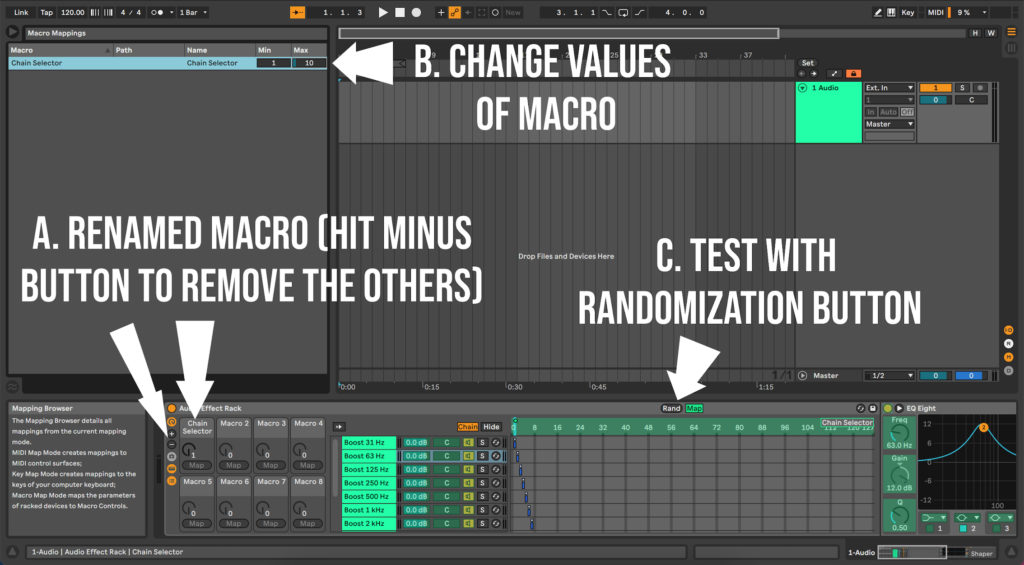
You’ll notice a button named ‘Rand’ has appeared above the chain selector – we will use this to randomize which chain activates, but first we need to limit it’s range between one and ten (since that’s where our zones are).
 
Let’s clean up the macro knobs a bit by repeatedly pressing the minus button (A), until only the chain selector is left.
 
Now right click the chain select ruler and choose ‘Edit Macro Map’ from the menu. This will open up a box to the left of the arrangement window, showing the min/max values of the chain selector macro knob.
 
Simply change the minimum value to ‘1’ and the maximum value to ’10’ (B). You can test this by clicking the ‘Rand’ button a few times to make sure it stays within those values (C). 

Unlike the Golden Ears CDs this patch is based from, this randomization method may choose the same answer more than once in a row!

5. Map Randomization to the Keyboard
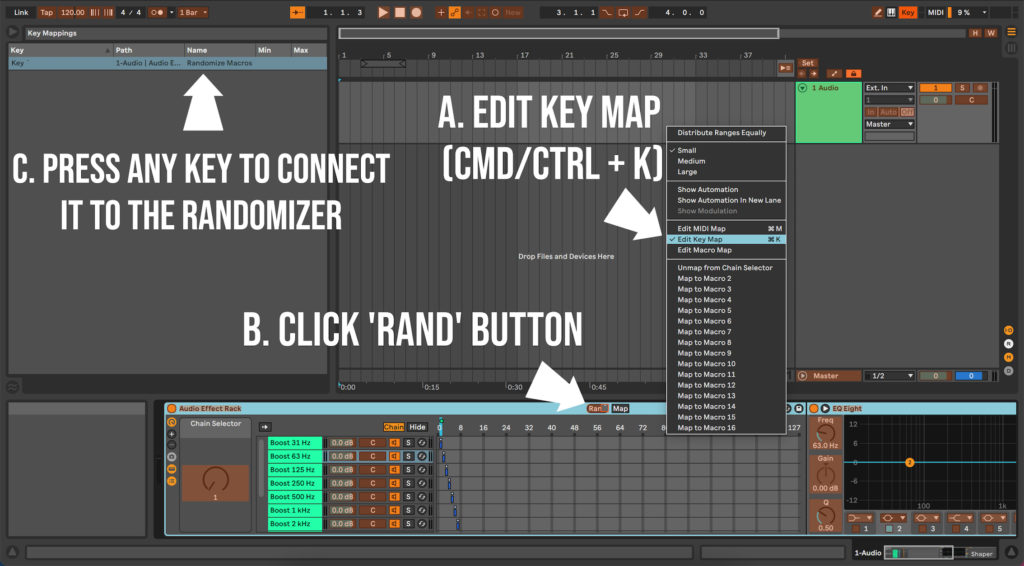
Fig 7.
 
We’re getting close, folks! The final step to making this patch practically useful is to map the ‘Rand’ button to our keyboard, so you can close the effects rack and hide the answers from yourself (until you check them later).
 
First, right click the chain select ruler again and choose ‘Edit Key Map’, or just press CMD/CTRL + K (A). Then click the ‘Rand’ button (B).
 
The next key you press on your keyboard will now be connected to the randomize button – that is, pressing that key will be like pressing the button itself.
 
I recommend choosing a key you don’t use often – in this case, we’re going with the ‘~’ symbol (C). Press CMD/CTRL + K again to exit the key map.
 
At this point, you can double click the title bar of the effects rack to close it, and just randomize by pressing your mapped key instead.

6. Test Your Patch

Fig 8.
You are now ready to test your random frequency-boost patch. Here’s how:
 
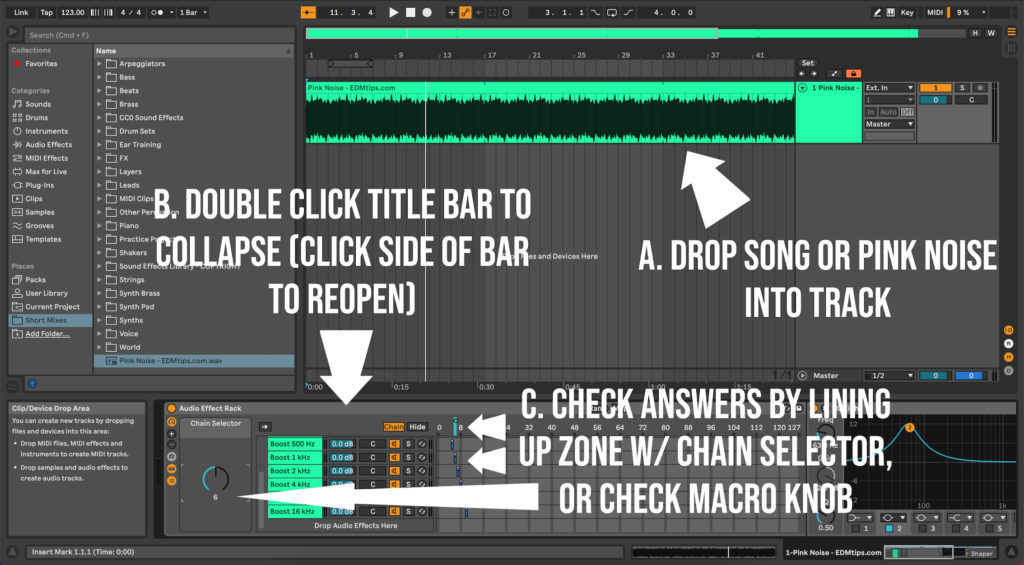
  1. Drag any song you like into the audio track in the arrangement window, or download a pink noise sample and use that instead (A).
  2. Making sure the effects rack window is collapsed (B), press the ‘~’ key to randomize (or whatever key you chose).
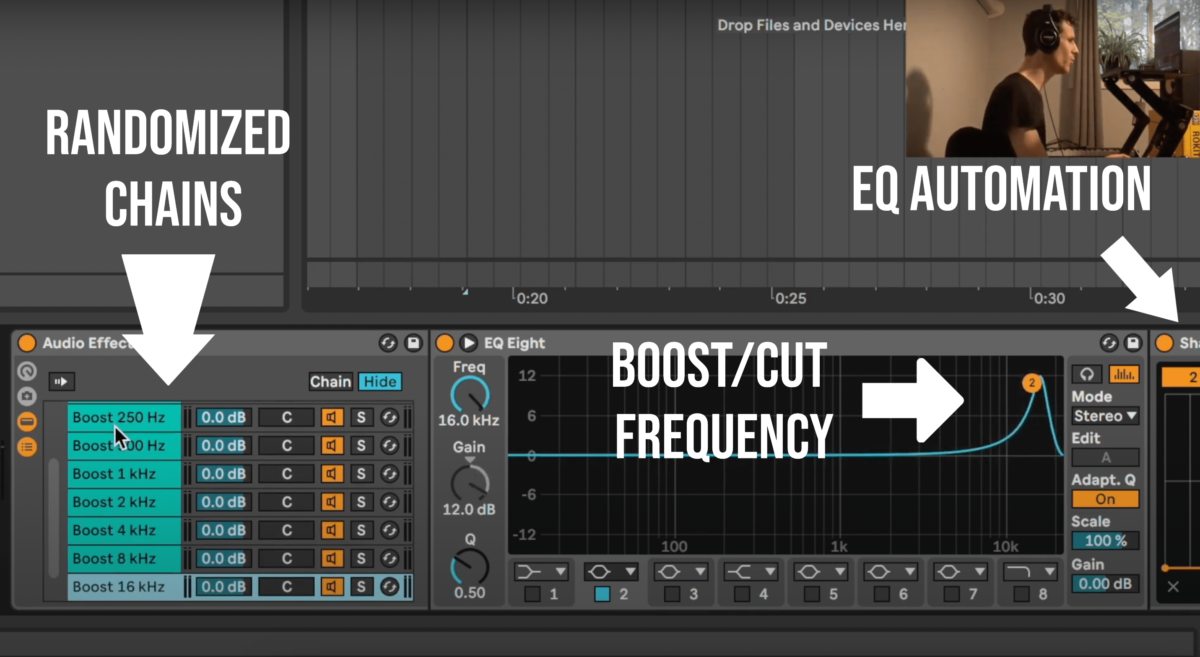
  3. Press play. You should hear the unaffected sound initially, followed by a boost and the randomized frequency for several seconds before returning to normal.
  4. Make a guess at what frequency range was boosted, then double click the effects rack again to expand it and check your answer (C).

Pink noise is especially good to start, because it plays all frequencies at the same intensity, making it easier to spot changes.

Don't forget that you can use wider ranges than '1-1' for each chain - but then you'll need to increase the maximum for you macro as well!

7. Adding Attenuation Chains
 
Congratulations on getting this far! Now that the heavy lifting is done, it’s much simpler to set up randomized cuts to the frequency range as well.
 
For this we will need another ten chains: Highlight the top chain, hold SHIFT, and click the bottom chain to highlight them all.
 
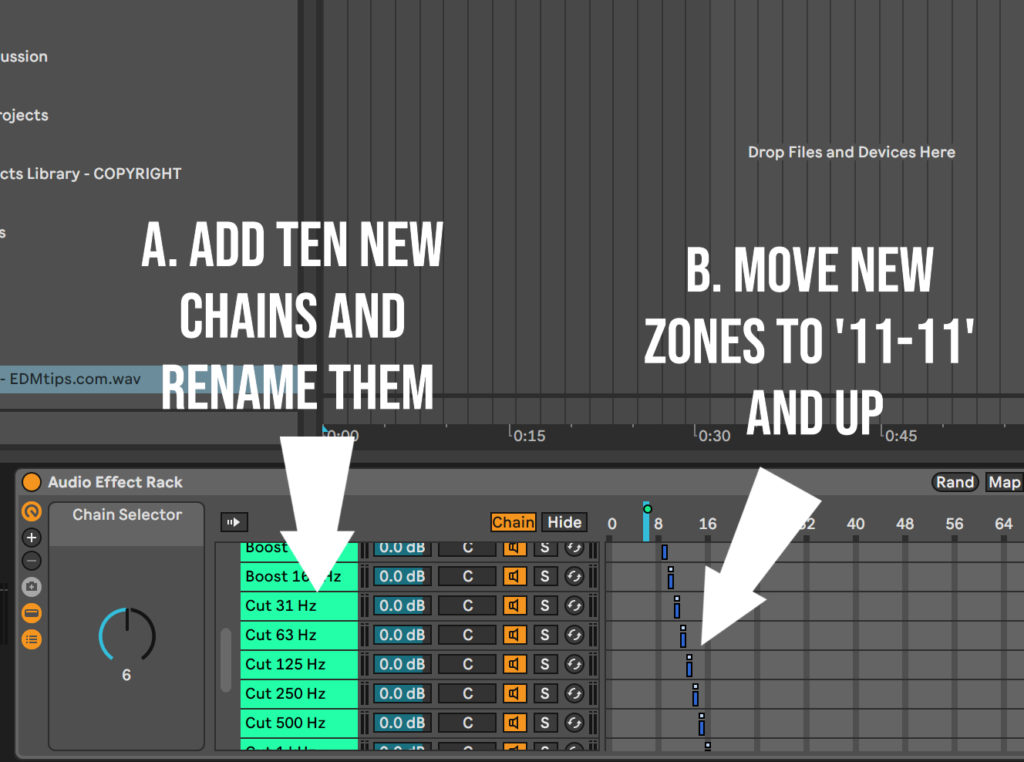
Hit CMD/CTRL + D to duplicate (the new chains will be added below). Rename each new chain from ‘Boost’ to ‘Cut’ (A).
 
These new chains need new zones to activate, so drag the ‘Cut 31 Hz’ over to zone 11, the next one below to 12, and so on up to 20 (B).
 
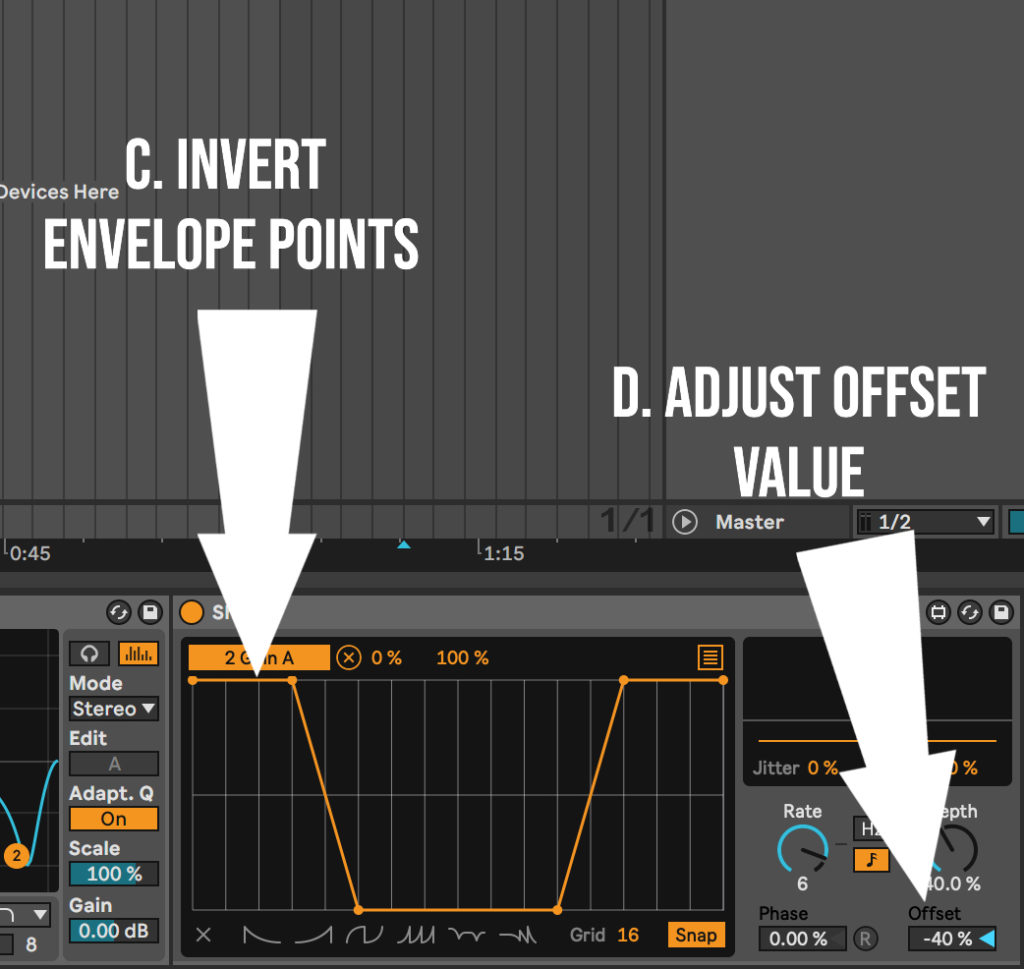
Once that’s done, click the ‘Cut 31 Hz’ chain again and move over to the shaper. Invert the envelope points according to C, above. Finally, change the offset value to negative 40% (D).
 
Your EQ should now be cutting by 12 dBs instead of boosting. Repeat this for all your new chains.
 
Just before you pat yourself on the back, reopen the macro map and change the maximum value of the macro to ’20’ to include those new chains in the randomizing process (see fig 6).

You can change the min/max values for fewer options - for example, to only practice boosts for the first 5 octaves, change the minimum to '1', and the maximum to '5'.

Final Practice Tip

You’re done! Let me wrap up by giving a suggestion on how to practice:
 
  1. With the effects rack collapsed and a song or pink noise ready to go, hit the randomization key on your keyboard, press play, and guess what frequency you think is being boosted or cut.
  2. Repeat this ten times, without checking your answers. Type your guesses down in a text file.
  3. Then open up the effects rack and check your answers in reverse. For example, you will see your tenth guess when you open the rack. Then you can hit CMD/CTRL + Z to return to each previous answer.

BTW, if anyone knows a more efficient way to do this, or how to do it on another DAW, let me know!

I hope this helps you train your ears to recognize and better appreciate those subtle changes in the music you hear. Until next time.

Share via
Copy link
Powered by Social Snap